Showing posts with label Dressmaking. Show all posts
Showing posts with label Dressmaking. Show all posts
Monday, 25 May 2020
Pattern Review: Wilder Gown

Enter the Friday Pattern Company Wilder Gown. I bought the PDF pattern directly from their website a couple of weeks ago. There are quite a lot of pages (30 for the pattern, and another 19 for the instruction booklet), but I appreciated their effort to minimise printing by suggesting I draw out the skirt panels myself, since they are simple rectangles. The option to print these panels as part of the PDF is there too though, for those who don't have a long enough ruler!
FEATURES


The Wilder Gown is a full and flowy shin-length dress. It has a bodice with raglan sleeves, with two options for sleeve length - ending just above the elbow for the short-sleeve version, and mid-forearm for the long-sleeve version. The sleeves are loose-fitting throughout, but not billowy. The neckline has a wide channel around it with an inch-wide ribbon threaded through, which can be tied into a bow, gathering the bodice into a ruffled collar, or left undone. The centre front of the bodice is split down to mid-chest, but if the bow is tied this is generally hidden. The skirt is made up of two tiers, both gathered around the top, so that the dress becomes fuller as it goes down.


CONSTRUCTION
Despite sewing for nearly 10 years now, I am quite a slow worker. I was very pleased to find that I could make the pink version within a day (which is almost unheard of for me!). I used a very soft and lightweight viscose from Sew Me Sunshine.
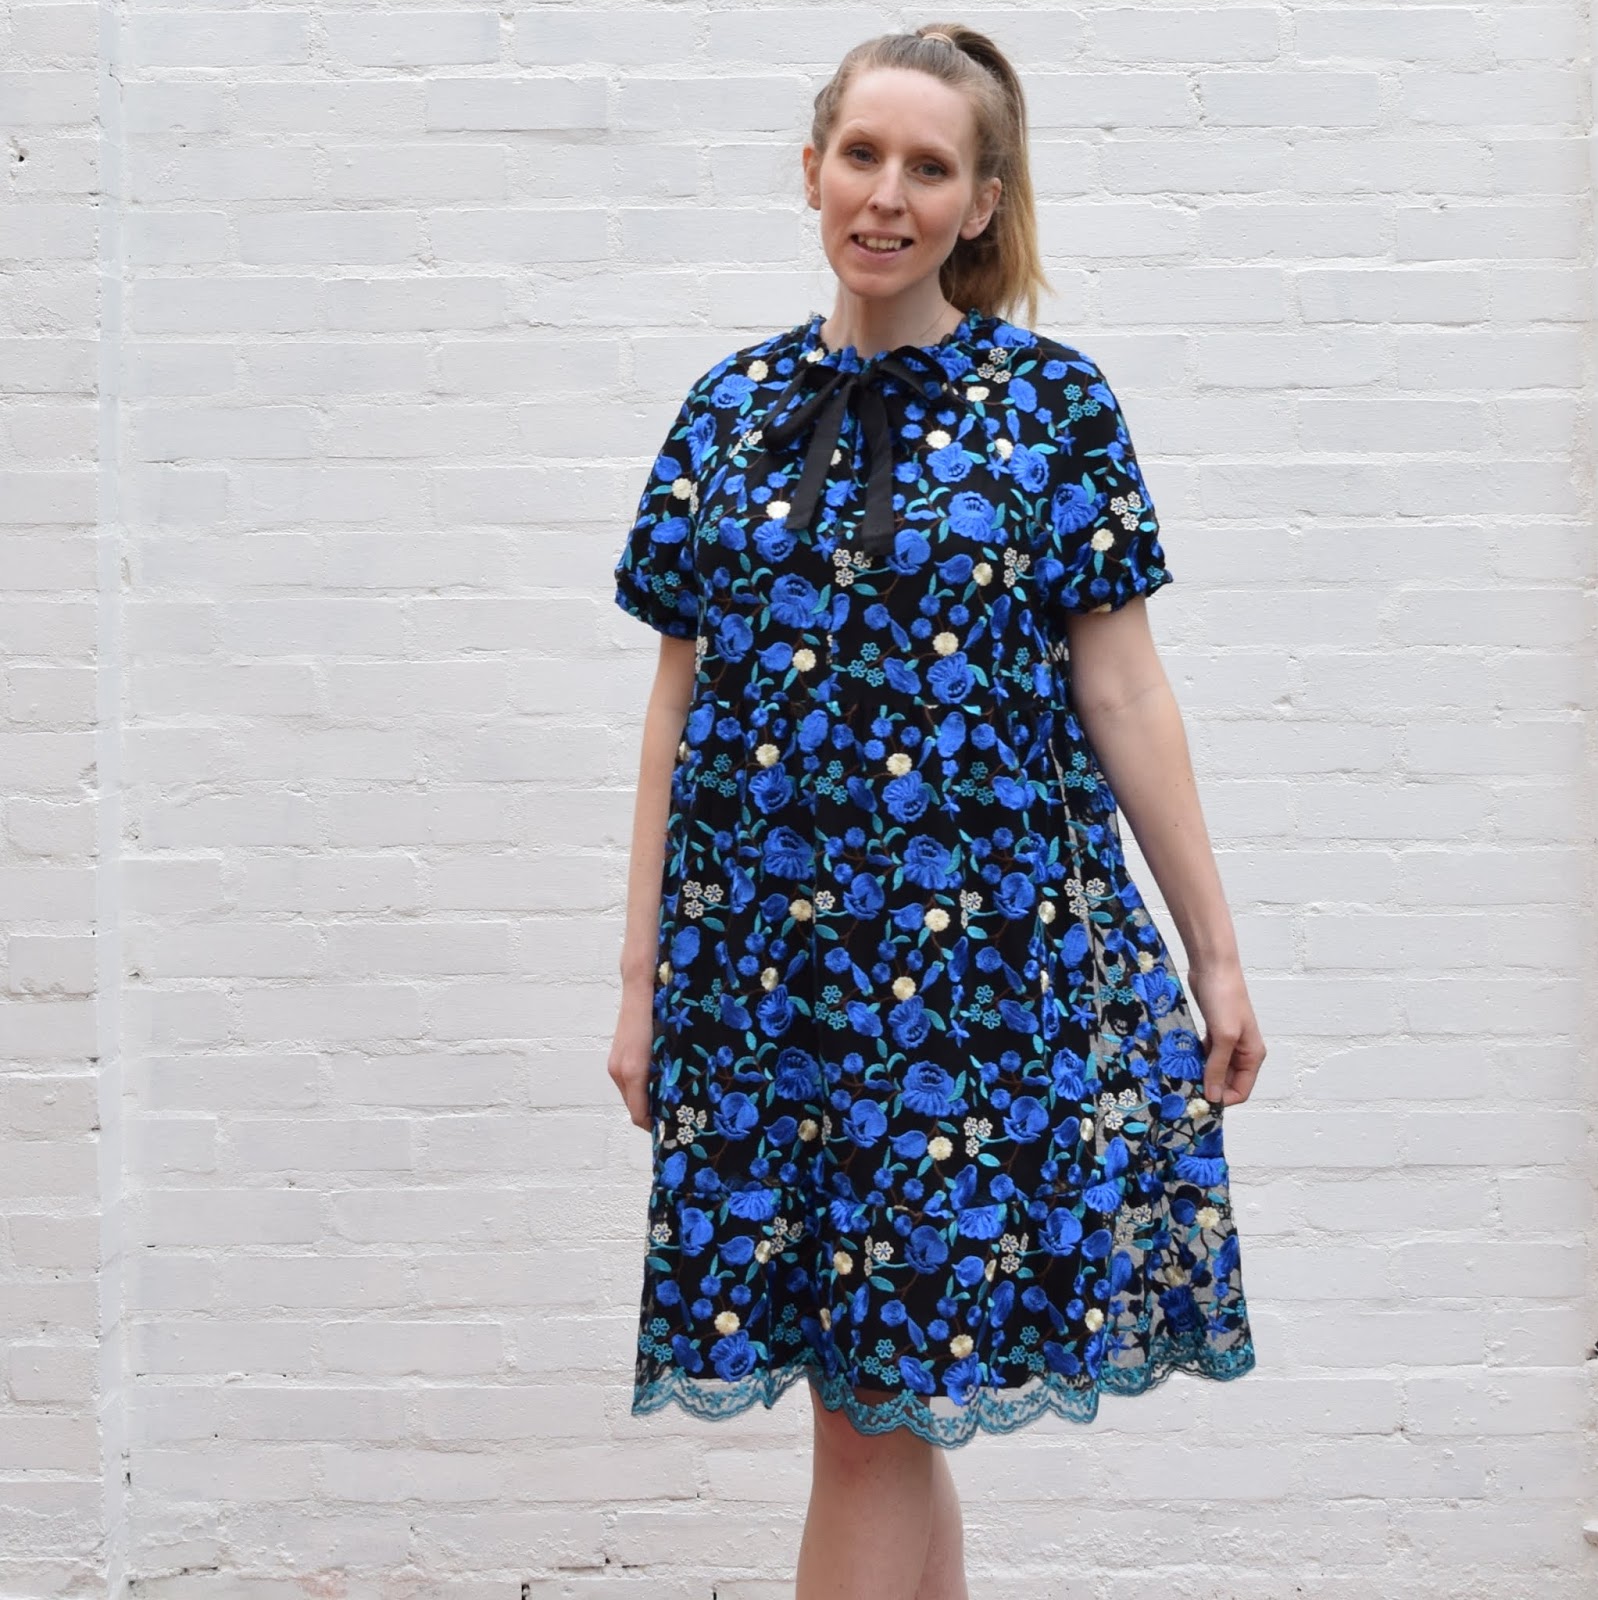
The blue dress took longer, three or four days, partly just because I was being a lot more careful with the delicate embroidered tulle fabric, but also because it needed a lining - so I was essentially making the dress twice! And then joining the lining to the main fabric was a bit fiddly too. The embroidered tulle came from a fabric shop in Ho Chi Minh City, Vietnam, and the lining is a standard black lining fabric from John Lewis.


I have seen people report that they have made their Wilder Gown in an HOUR (?!) or two, which seems crazy to me. If I have decided how to lay out all my pattern pieces within an hour I think I'm doing well! Anyway, the point is: this is a fairly quick make.
There is nothing particularly challenging in the construction process. The instructions are very good - clear and concise, and there are lots of diagrams. You just need to have a bit of patience when gathering the skirt tiers, particularly the lower one, which is looooong! And of course it requires hemming too, arghh. This also means it devours plenty of thread, so make sure your bobbin is fully loaded up!
FITTING
The pattern is very loose-fitting and airy. This makes it perfect for me as summer maternity wear - it's super comfy and shouldn't get too hot. But it's also a very cool silhouette for a non-pregnant person, which is why I wanted to try it.
It is drafted for a height of 5'5" and a B-cup bust. I am bang on 5'5", but my bust is currently an E-cup (gearing up for breastfeeding!) There are markers on the pattern where you can do a full bust alteration if your boobs are also on the larger size, but I didn't bother and have not had any trouble with the fit, since the style is so loose anyway.
For reference, my measurements are currently B: 36" W: 28" H: 37". For the pink dress, I cut a medium bodice, and small skirt. For the blue, I cut a medium bodice, and an extra-small skirt. In both cases, the smaller skirt was to help me save on fabric, and just means the skirts are slightly less gathered and full than the design intended.


As a personal preference, I tend to like a defined waistline. This dress absolutely does not have that! The original pattern requires a full embrace of the boho vibe, or can be transformed into more of a baby doll shape if you shorten it and make it in a slightly stiffer fabric. Either way, it is very full. However, if you prefer a defined waist too, I found a simple and effective solution to this. I've explained below as an alteration that I made to both dresses.


ALTERATIONS
One of the great things about this pattern is how easy it is to make alterations to the length of the skirt(s) and sleeves. It really allows you to make it your own. I've seen so many beautiful and very different versions on Instagram and have used some of them as inspiration for my own creations.
On the pink dress:

On the blue dress:


On both versions:

RECOMMENDATIONS
This is a lovely and surprisingly simple pattern to work with, so I would highly recommend it. Particularly because it is so easy to alter to create different looks, and the instructions are friendly. The only downside from my point of view is the fabric expense if you plan to make it at the original length.
Having now made this dress twice, there are some general alterations (unrelated to fit) that I have made to the pattern pieces which may be helpful to other makers. This is a bit techy so only really worth reading if you have the pattern in front of you and you're about to get started! In which case - happy sewing!
- The original pattern uses two strips sewn together to make the tie that goes around the collar. I calculated the full tie length (the length of the original tie piece minus the 1.5cm seam allowance, then doubled). Then I cut just one pattern piece at this full length to avoid having the seam, thus saving myself a little bit of time and fabric. And I just think it's a bit neater.
- The pattern asks you to cut three panels for the bottom tier of the skirt. But this means having three seams in what I think are kind of awkward places, either one right down the centre-front or two that are visible from the front... I would rather have just two seams, in line with the higher skirt tier, down the sides. So again, I did a bit of maths. I calculated the full circumference of the lower skirt tier (skirt panel width x3), and then halved it so that I could cut two wider panels instead. This does mean now having separate pattern pieces for the two different skirt tiers, but I think it's worth it.
- Lastly, 1.5cm always seems like quite an excessive seam allowance to me, and find myself trimming the fabric down afterwards when finishing the raw edges so that they don't flap around on the inside. So I reduced the seam allowances on the pattern pieces from 1.5cm to 1cm, to avoid trimming and to save a little bit on fabric again. I did leave the seam allowance as 1.5cm for the seams joining together the dress tiers though, to allow space for the skirt gathering.


Monday, 7 October 2019
Pattern Review: Simplicity 8637

INTRODUCTION
I bought this deep red, waffle-texture poly over Christmas while on honeymoon in New Zealand, from Drapers Fabrics in Auckland. I very much have a habit of buying fabric simply because it's pretty, without any real idea of what I will make with it. That was certainly the case here. I just thought, "some sort of floaty-summer-skirty-dress-thingy" and asked for the standard 1.5 metres that I always ask for when I don't have a clue what I'm doing.
It can be tricky to find a suitable pattern when you simply have a vague vibe in your head. I tend to browse through the patterns of all the companies I know and love (Papercut, Colette, Simplicity, Sew Over It, McCalls), and save any potential winners on Pinterest. I now also ALWAYS check Instagram for "real-life" versions of each one. This is incredibly helpful to consider fit issues, learn about the construction process and be inspired by alterations.
And that is how I settled upon Simplicity 8637. I saw a lovely version with altered sleeves and shortened flounce by @hobos_of_hoboken on Instagram and I was totally sold. So I have made Version D with these alterations too.

ALTERATIONS
I shortened each flounce piece by 3 1/2".

I reshaped the sleeves from billowy to fitted, shortened to elbow length and added a flounce.

Due to my shortage of fabric, I didn't cut a bodice lining. I just cut out the neckline interfacing pieces in the fabric as well as the interfacing, and finished the edges on the overlocker (the perfectionist in me wishes I had bought red overlocker thread!!)

I cut the skirt-back on the fold instead of as two separate pieces, by removing the centre seam allowance on the pattern piece. I did the same for the flounce-back. It just seemed unnecessary to have a seam since there isn't a zip there or anything...

I also made a second version, for which I shortened the bodice by 1" to improve the fit.


CUTTING OUT
Cutting out is a bit of a mission, as there are plenty of pattern pieces, thanks to the flounce, bodice lining, waist-tie, sleeves... One thing that you need to remember is that the front flounce pieces are not symmetrical. There is a left flounce and a right flounce. The right is longer because it sits on top when you wrap the dress around. If you are cutting out on the wrong side of your fabric, you will need to flip both these pieces over so that they are face down. Otherwise (like me on my second dress), you'll end up having to put the shorter piece on the right hand side and it won't reach all the way up to the waistband. This is a bit hard to see thanks to the jazziness of the fabric!


CONSTRUCTION
The instructions and diagrams are clear, and the process is not too long-winded. There are a lot of darts to contend with right at the beginning (12 altogether, so you will be a pro by the time you finish!). The sleeve shoulder is slightly gathered, and so takes a little care to distribute evenly. The waist tie pieces take some patience to turn the right way round and iron flat. Remember to trim the seam allowance from the corners while still inside-out, or you won't get nice sharp corners once you've turned them!
I'd never sewn a flounce before and was relieved it was straightforward. It hangs in those beautiful ripples simply due to the curved shape of the pieces and not because of some clever work you have to put in. It takes a bit of pinning, because you're lining up two edges that naturally curve in opposite directions and so you need to tease them both straight.
FINISHING
The first time round, I made life very easy for myself. I hadn't used a lining so no handsewing needed to fix it down. I also left the sleeve and skirt edges unhemmed, securing them just with a zigzag stitch so that they have a soft, slightly frayed finish, which I'm kind of in love with.

The second dress took longer, since I did include a lining and I did hem. I was worried that it might not hang as nicely once hemmed because of the slight bulk, but it is absolutely fine.
CONCLUSION
I love this pattern. The style seems pretty versatile. It's always going to be a little bit fancy, but I feel like I could wear it on a nice summer's day, as well as dressing it up with heels on an evening.
The wrap-around is flattering and the overlap is wide enough that you don't need to worry about flashing anyone your downstairs, even on a windy day!

Upstairs can be a little more of a concern... As shown in the alterations section, the second version is significantly better because I shortened the bodice, but on the red version it does have a tendency to open up around the cleavage due to the way the waistband sits. I have been using body tape to stop me falling out of it.
All in all, I'm very happy indeed to have two new wearable and super-pretty dresses.And I can certainly recommend the pattern. For a dress with quite a few details, none of the process was particularly fiddly, and the instructions were easy to follow. I know I made quite a few alterations, but only one (shortening the bodice) was related to fit issues with the original pattern. And it was easily remedied. All other alterations were just personal preferences!
MORE PHOTOS...


Thursday, 4 July 2019
Fashion Fix Friday

Since the big IPCC report came out last October warning us of the urgency for action against climate change, I have spent many hours anxiously pondering how I can help. Somehow at that point, after many years of passively agreeing that global warming was a problem - and one caused by humans - I finally felt the weight of it, the sense of responsibility and the necessity to act now.
With this new personal sense of urgency has sometimes come panic and despair. I have found myself emotional, fearful that I won't be able to achieve enough, and as a result I have done very little. I look at big companies and governments who either don't care or flat-out deny climate change and it makes me feel helpless. But I think many of us feel like this, and we need to shake it off. Our first focus must be on the one thing we have full control over. Ourselves. What can I do? What am I willing to do?
Having read about the changes we can make as individuals, Tom and I immediately cut down our meat intake. The idea of being officially vegetarian still seems intimidating, but opting for veggie dinners three or four times a week has actually been incredibly easy. And cheaper. And it has been heartening to discover that friends of ours have done the same. It has been fun to share recipes. It has been a relief to talk about our concerns and our actions and find ourselves united. A month after making this change, we read that UK supermarket meat sales had dropped by 30% in the last year. It felt empowering to be part of a movement.
Small actions taken by many individuals lead to significant changes. Sure, we haven't done anything radical. We haven't done enough. But in our classically awkward British way, we have each tentatively, politely poked a finger in the air and said "Erm, excuse me, I don't know about everyone else - but I do trust in and care about the findings of the climate scientists, and I am open to making changes to my lifestyle. (Sorry, I hope I haven't offended anyone.)" Collectively, that message has been carried through the media, to tell our government - the people who can change our culture - that this nation cares.
Aside from my meat reduction, I haven't done much yet. I've taken a course on the science of climate change on FutureLearn to help me understand the issues and communicate more confidently. I've vaguely been thinking about driving less and saving energy around the house. But I have been stalling. I've felt like I need to come up with something amazing, a solution that will fix everything, and I can't - obviously I can't! I'm one person. No matter what changes I make personally, they are negligible on a global scale. I need everyone else to take action too.
But who I am to tell others what
to do? I am scared of being a preacher. I am reluctant to pass my guilt on to
others. I feel like a hypocrite, with my long-haul flights to New Zealand over
Christmas, my frequent driving, my unwillingness to give up meat entirely. There are other people who have made much bigger
sacrifices than me, and people who understand much more about the science than
me.
But that doesn’t mean I should be
voiceless. This isn't about judging each other for what we have or haven't done. We
need to support and encourage and inspire each other in the actions we take, even if they are only small. We have to be willing to talk if we want to help bring about change.
So here I am.
When I found out that the fashion industry is one of the biggest contributors to carbon emissions, waste and micro-plastics, I congratulated myself on having barely bought a single item of clothing in the last three years. But the truth is, I haven't stopped buying clothes because I've been eco-conscious. I've stopped because 1) I can't really afford it anymore and 2) I simply get no joy out of buying clothes now that I can make them.
And then I found out that the fabric I buy to make my clothes goes through all of the same carbon-emitting processes as the fabric used in large-scale clothing manufacture. Which I guess is pretty obvious really. Looking at the mounds of fabric in my sewing room, I realise I shouldn't be congratulating myself on rejecting high street fashion. This stuff doesn't even get worn! It just sits about in my cupboards, hoping to one day be turned into clothes. I also have masses of shop-bought clothes that haven't seen the light of day for years, packed in cardboard boxes, for - I don't even know what.... Just in case. And of course, there's that pile of clothes that I have planned to repair for the last year that always gets pushed to the back of the sewing queue.
So I have a new mission. I might not be willing to stop driving, or give up cheese. But I can certainly look at reducing the waste and increasing the longevity of my clothes. I can donate things to charity shops, recycle, repair and alter, and be disciplined in working my way through my hoard of untouched fabric. I'm going to give myself a project each week - from simple tasks of resewing a button or lining, to more creative challenges like updating or refitting a decade-old dress and the "from-scratch" endeavours using the fabrics I bought on a whim because I liked the texture or the print or the price.
I will share these projects with you every Friday as what I'm dubbing #FashionFixFriday. And if anyone fancies joining in at any point, you would be so very welcome!
Monday, 18 March 2019
Goodbye, skinny jeans
After the great success of the shorts, I was keen to crack on with the trouser version of Mum's vintage pattern. As someone who has obediently followed the skinny jeans trend for the last decade - despite their tightness, tendency to fall down and their generally unflattering shape on me - I am now very ready to jump ship in want of a looser fit.On the first day of our honeymoon in December, I packed Tom off with a local friend in Auckland so I could explore some of the city's fabric shops. I spent a very enjoyable hour in Drapers Fabrics, inspecting the bolts thoroughly and dreaming up new garments. I came away with two perfect trouser fabrics. One was a lightweight monochrome-striped cotton, and the other a medium-weight crepe in the most beautifully warm and rich blue. (This picture does NOT do the colour justice!)

Over the last month, I have sewed up both pairs and I am massively excited about the results.
First were the monochrome stripes. I cut the pattern to the full trouser length, using my previous edits to loosen the waistband with narrower pleats and darts. I took care to get the stripes exactly vertical across all my pieces, and did my best to align the stripes where they joined along the centre seams, and from the waistband to the trouser legs.

As with the shorts, I added belt loops and made a belt with a matching fabricated buckle.
Having seen on the high-street lately a wave of wide-legged cropped trousers, I spent a couple of days agonising over whether to shorten mine, turning them up and trying to get a feel for how they would look with various footwear. But I eventually chickened out, worrying they might make my legs looked a bit stumpy, be less versatile and age faster fashion-wise.

Plus they look fab full-length anyway! I just have to hope they don't immediately get scraggy from dragging along the ground...


I still really wanted some lovely cropped trousers though, so Trousers #2 were more of a leap of faith. I studied the shape and length of the ones I liked on the Topshop website, and decided I would like them cropped mid-calf and more billowy than the last pair.


Again I used my edited pattern for the waist, but this time I also altered the legs, taking a conservative 10cm off the length (with the intention of probably shortening them further), and flaring them by 5cm on the outside leg and 2cm on the inside. Before hemming them, I tried them on with my various footwear again, and then cropped them an extra 10cm.


Now I am completely in love. Particularly with a pair of heels on, they look super-chic. They even make Grandma's old hand-knitted jumper look glamorous!


Popular Posts
-
 Okay, I'm six months pregnant. Time to accept that my normal clothes, and especially my normal trousers, no longer fit. The last few ...
 -
 I fell in love with the Libby Shirt during #MeMadeMay, after seeing a beautiful version shared by @canningmakes on Instagram. I immediat...
 -
 INTRODUCTION I bought this deep red, waffle-texture poly over Christmas while on honeymoon in New Zealand, from Drapers Fabrics in Auc...
 -
 I only became aware of Tessuti Fabrics ' patterns through this year's #memademay, after a couple of other sewists posted pictures ...
 -
 It dawned on me on our first morning in Ho Chi Minh. Vietnam should have some pretty exciting and potentially great value fabric kicking ...
 -
 Two months ago, I showed you the clothes that I had been frantically sewing for my expanding pregnant belly. As promised, I am here checking...
 -
 After bagging five Munros last year while visiting Fort William for the Downhill World Champs, I started looking into the challenge of beco...
 -
 So, happy news! Baby Mabel arrived smoothly in early October, making us a new family of three. Yippee! It is by some small miracle that I fi...
 -
 After the great success of the shorts, I was keen to crack on with the trouser version of Mum's vintage pattern. As someone who has ob...
 -
 So, I am pregnant! Knowing that I will grow increasingly large over the summer, reaching my maximum state of enormousness in October, my s...