Wednesday 7 October 2015

First Steps To Becoming A Munroist

After bagging five Munros last year while visiting Fort William for the Downhill World Champs, I started looking into the challenge of becoming a Munroist. This is a dream of many hikers, in the UK at least. For those unfamiliar with the term 'Munroist', this is a title you can claim once you have climbed to the summit of every Scottish mountain over 3000ft high. Reaching each individual summit is referred to as "Munro bagging". It's definitely a massive commitment - my dad has been heading up to Scotland once a year with his pals since I was 12 (that's 15 times so far), and he's bagged 70 of the 282 qualifying peaks. So, only just approaching the quarter-way mark! BUT, I found out that if you complete all of them, you receive a special tie or brooch. Which is obviously frickin' awesome.

Up until then, I had a grand total of ONE Munro, Ben Lomond. So adding those five Munros from last summer (the Ring of Steall and Ben Nevis), I'm at six...

There is a long way to go, and a lot to learn! Thankfully my boyfriend Tom seems equally enthusiastic about getting his tie, so we've spent the last month eagerly planning another trip, catching the Caledonian Sleeper train from London Euston, up to Fort William again. Tom in particular has been reading a lot about Munro bagging, and was excited to find out that many of the Munros cannot be reached (easily) on a day hike. Assuring ourselves that we were serious about our new hobby and ultimate ambition, we invested in A LOT of new lightweight camping kit. So now, regardless of our enjoyment of wild camping, we've agreed that we must continue to go until we have saved back the total cost, that we would otherwise have spent on hotels. Pressure.


So what will we be carrying on our trips?
  • Lightwave t1 ultra xt tent - a lightweight two-man tent with large porch (suitable for people who have spent the entire day walking in the rain and don't want to get their sleeping area wet!)

  • "His and hers" Mountain Hardwear Ratio 15 and Heratio 15 sleeping bags - Tom did a HUGE amount of research and these were the best just-about-affordable light-but-warm sleeping bags he/we could find. Had to order from U.S.

  • Sleeping bag liners
  • Thermarest NeoAir XLite airbeds - much more expensive than we had planned, but totally worth it. Amazingly light and actually comfortable (although very noisy to turn over on!)

  • Primus Eta Spider stove set (stove, lidded pan and bowl) and gas, flasks, sporks
  • Sawyer mini water filter and purification tablets
  • One set of "dry clothes" - light trousers, t-shirt, warm jumper - to be worn in the evening and overnight, strictly kept in a binbag during the day
  • Body warmer, hat, gloves, waterproof jacket and waterproof trousers - worn as necessary... I should most certainly invest in some waterproof gloves too.
  • Enough underwear and MORE than enough socks
  • Head torches, trowel, toilet roll, toothbrush/paste, soap, travel towel, paracetamol, sun cream, INSECT REPELLANT, hayfever tablets (which work as anti-flammatories for the midge bites that I am guaranteed to get regardless of drowning myself in repellant) 
  • FOOD! We got tonnes of good tips from this Heart and Soil blog post to get the most calories from the lightest weight
  • Dry bags and bin bags - not just for storage, but to sit on too.
  • Map, waterproof case, compass
  • Tom had Cotswold Outdoor Explorer UL poles - surprisingly light and much cheaper than other brands
  • And after all that effort to keep the weight down, my SLR camera :D
BRING ON THE FIRST HIKE!!

Friday 4 September 2015

Colette Violet Blouse


Until very recently, my experience of pattern shopping has mainly been to sit on the high stools in John Lewis, flicking through the pages of the catalogues and turning my nose up at almost everything. With the exception of Simplicity’s Amazing Fit collection and Cynthia Rowley, I tend to be left feeling uninspired, and wishing dressmaking was popular enough to warrant more fashionable designs. I began to wonder what The Internet might have to offer. Honestly, my first browse of Raystitch was a DREAM. Fortunate timing meant my birthday was just a month away, so I came up with a magnificent list of present suggestions, via my Dress Patterns board on Pinterest. And to my absolute delight, my boyfriend Tom bought me every single pattern! (Boy done good.)  I now have a selection of patterns by a number of companies I have never used before. The next few blog posts will document my experience of each one.

We’ll start with the Colette Violet blouse:


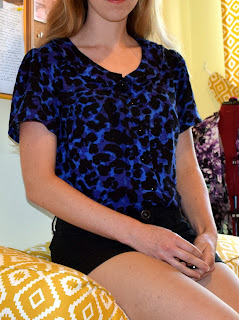
I’ve read other dressmakers’ blog posts on this pattern, and it seems to be a hit. Let me chime in on that. This is, I think, the loveliest pattern I have ever worked with. It has pretty details without being fussy, or difficult. For a shirt, it's also rather modest in the number of pattern pieces needed (that number is 11, in case you're wondering), which is great since cutting out is the most tedious, boring job in the whole process, as far as I'm concerned. (I have another shirt pattern that uses 23 pieces. I tried making it in silk a few months ago. Never Again. The end result was awful too... Let's stop talking about it)


I bought 100% polyester fabric in John Lewis with a print that my sister has dubbed 'midnight leopard'. Surprisingly soft, easy to iron, and lightweight without being sheer (hooray, fabric that will sit nicely without people knowing what bra I'm wearing!). It was easy to mark onto, cut well, and wasn't particularly prone to fraying. Onto a winner.


The instructions came in a nice booklet, and didn't try to cram too much on each page, which made it feel a lot less daunting. The instructions were clear and there were plenty of diagrams, where each pattern piece was labelled (no guessing games!). The pattern came on tissue paper, easy to iron flat, cut and pin through. The markings were printed clearly, and it was obvious which size each line corresponded to. And the booklet had a page at the back for making notes, and a sleeve to store the pattern pieces in. Nice touch.


There was just one thing I found tricky in the pattern. When attaching the collar, I found that it was a little short, so it left a bit of a gap at the front. Next time I will pay more attention to the seam allowance when joining the front and back panels together, and check the resulting circumference before cutting the collar pieces, so I can adjust the length accordingly.


The pattern asks for 1/2-inch buttons, but I used slightly smaller ones, about 3/8-inch, and didn't find it to be a problem at all. My favourite thing is the gathering beneath the yoke at the back. Makes it fall beautifully. But I think that delicate detail, and the gathers at the top of the sleeves, would not work anywhere near as well in a stiffer fabric.


The fit seems very forgiving. I guess I'm pretty lucky in that I'm a very average shape - no impressive bust, or wide shoulders for me. But even so, I find I have to make adjustments here and there. Not with this pattern. It's loose and floaty, while still flattering. And I can lift my arms up very happily without it tightening across my back. So I will definitely be making it again! Maybe next time with a contrasting collar....

Powered by Blogger.

Popular Posts